Model Airbrush Techniques – Scale Modelling Tips
So you’ve mastered the basics of model painting, and you want to take your builds to the next level? Airbrushing is an excellent, efficient way to give your scale models a professional finish. Many modellers would agree that an airbrush is a worthy investment, and an essential tool for larger scale model projects. But it’s not a tool you can just pick up and use, so follow our model airbrush techniques below to transform your scale models!
1) What is an airbrush?
To put it simply, an airbrush mixes paint and air internally – so when you push the button down, air passes across the nozzle and disperses the paint onto your model. This results in a much finer atomisation, and enables you to create accurate, consistent patterns. By making slight adjustments to either the air or paint supply, you can create a wide variety of effects. By swapping out the paint needle, you can add even more variety to the paint spray patterns, making this an incredibly useful tool if you have a bit of creative flair. Before we cover more model airbrush techniques, you’ll need to choose the type of airbrush – single-action or dual-action, which we’ve covered below.
2) Single-action airbrushes
This is the most popular kind of airbrush. To operate it, you only need to push a button to release the air flow and use a separate control, typically found below the paint needle or on the handle, to set your desired paint pattern. A constant paint volume makes it fairly easy to use, and means you can focus on controlling the air supply. If you’ve had enough practice, or you’re feeling bold, you can adjust the paint supply with your free hand while spraying. If you’ve mastered your model airbrush techniques, you can achieve some seriously fine finishes with your single-action airbrush.
Pros: Relatively inexpensive, simple to clean, gives you great overall coverage, fewer parts
Cons: Limited versatility, less control
3) Dual-action airbrushes
If you’re looking for greater painting precision and variety, the dual-action airbrush is for you. Here, a trigger is used to control both air and paint. To operate the dual-action airbrush, press the trigger to introduce the air, and slide it back to release paint. Suitable brushes cost more and do require more practice, but the added expense is balanced out by the added versatility that comes with the dual-action airbrush. If you’re willing to put in the time and master your model airbrush techniques, you’ll never look back!
Pros: Incredibly versatile, increased control, you can create finer lines
Cons: Costs more, more complex to operate, takes more practice to master
4) How to hold an airbrush
You’ve confirmed your airbrush type? Good. But how do you hold it? Thankfully this isn’t too tricky, and if you’ve ever held a pen or pencil then you’re off to a good start. Rest the airbrush in your chosen hand, with your index finger resting gently on the trigger. Note – your finger position will change depending on the brush type you use. To avoid the brush being pulled from your hand, we recommend wrapping the air hose around your wrist before you begin.
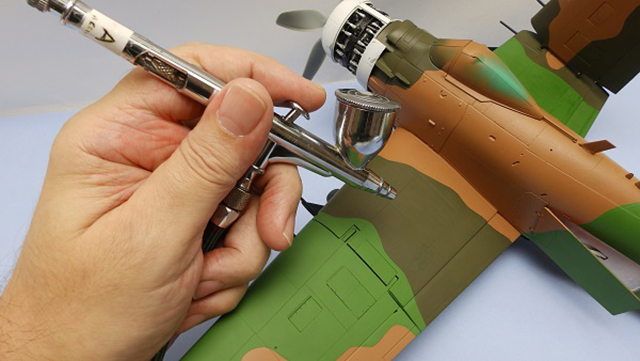
How to hold a single-action airbrush: Rest the second joint of your index finger on the trigger, pivot your fingertip to control the supply.
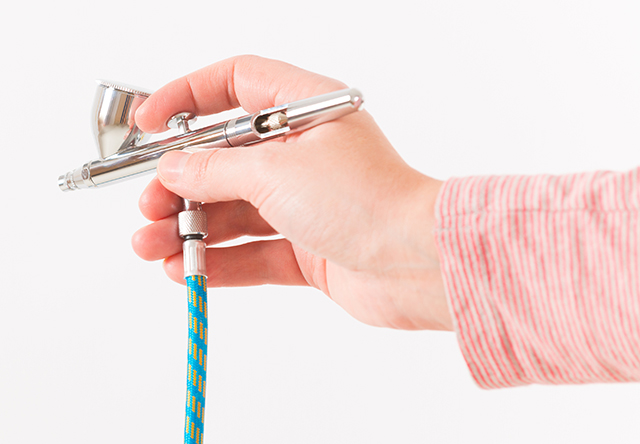
How to hold a dual-action airbrush: Rest the first joint of your index finger on the trigger, press and pull back all at once to control the supply.
5) How to paint with an airbrush
First things first, choose your ammunition – acrylic, enamel, or lacquer – your airbrush can handle all of these. Next, preparation is key. Shake your chosen paint, and use a toothpick or similar to loosen any pigment and mix it with the solvent. Give it another shake, then add thinner – this will ensure it runs through your airbrush without any hiccups. You’re looking for a milky consistency – a thinner to paint ratio or 1:3 is a good rule of thumb.
As you practice, also focus on creating a smooth coat, and maintain straight lines
If you’re applying a base or just want a general coat, we recommend you use 15-20 psi and hold it 10-18 cm (4-7 inches) from your model surface. If you’re too far away the paint will dry and may not adhere to the surface. If you’re too close the paint will run. Obviously neither of these is ideal, so practice on scrap parts before you move to your model proper. As you practice, also focus on creating a smooth coat, and maintain straight lines. This isn’t something that will come to you right away, but if you master these model airbrush techniques in the beginning you’ll be all set for your future projects.
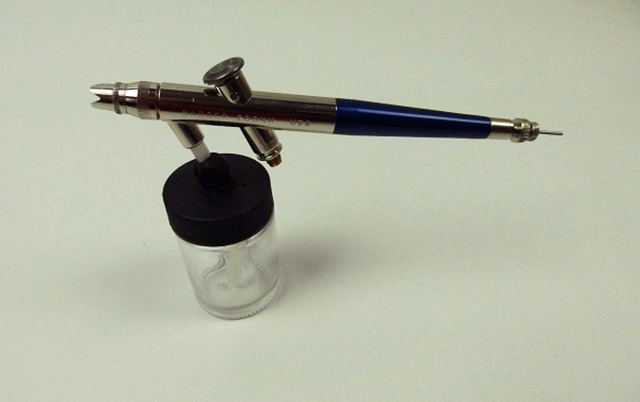
6) Reservoirs for spray guns and airbrushes
Paint reservoirs hold the paint supply for spray guns and airbrushes. The different types include glass jars which plug into the brush from below, or fixed or interchangeable cups for small quantities of paint. Airbrushes can have any type of reservoir; spray guns are normally available with jars only. Being able to change reservoirs is a great advantage: once you have sprayed one colour, you simply attach a reservoir containing thinner to clean out the brush, then replace it by another containing a new colour. Colours can be stored in jar reservoirs with screw tops.
7) How to clean an airbrush
You can’t do great work with dirty paintbrushes, and an airbrush is exactly the same. Even tiny amounts of dry paint can affect or impede your airbrush’s performance, so you need to clean it straight after use. Use a rag or tissue paper to wipe out the reservoir, then half-fill it with thinner. Blow the thinner through your airbrush until there are no visible paint particles. Hold a rag over the paint needle to force the air back into the reservoir, and let it bubble back to clean all passages.
Avoid standing the needle on its point, as this cause it to bend
After you’ve used it for a while, strip down your airbrush and soak the needle and head in thinner overnight. Avoid standing the needle on its point, as this cause it to bend.
Repairing a bent needle: Hold the needle against a flat surface at the angle of the point; run your fingernail across the point while revolving the needle.
Looking for a new airbrush to paint your models? Check out our Badger Airbrush Precision Spray Set! Let us know if the above tips come in handy, and if there are any additional model airbrush techniques we can share with the ModelSpace community! As always, we love to see your ongoing projects too, so please share your build photos with us on our social media channels!


